Plant this Fruit in your Veggie Garden

Can you guess what fruit we think is essential for any vegetable garden? It is one of the juiciest fruits and is full of flavor, though they aren’t too sweet. They come in a variety of colors from yellow to purple, though usually they are red. If you haven’t guessed, we are thinking of tomatoes! 

That is right; technically tomatoes are classified as fruit, though they are obviously used more often in savory dishes and nutritionally they pan out more as a vegetable. However you want to label them, they are delicious and one of the easiest things to grow. Furthermore, if you have ever had a home-grown tomato then you know that there is not much else that can compare to their rich color and burst of flavor. Here are our best tips on how to grow this sought after produce and our favorite recipes that are full of them!

Our Top Tips on Growing Tomatoes

Plant After the last Frost

The most important piece of advice we can give you is to make sure you don’t plant your seedling outside until your area has had its last frost. The handy map below can help you determine when this usually is in your area. For us here in the Ozarks, we can be sure the last frost has come when May rolls around. 

Until then, you can start your tomatoes from seeds inside near a window, or you can pick up seedlings at your local nursery after the last frost has come and gone. Some say it is best to let your plants spend a little time outside each day leading up to planting them so that they get used to the temperature.

National Centers of Environmental Information by The National Oceanic and Atmospheric Administration, “Last Day of Spring Freeze Map.”

Make Sure to Plant in Direct Sunlight

Tomatoes are native to South America, so it is no wonder they naturally like it hot! Most varieties do best in full sunlight. Make sure to give them a couple feet of space between each plant and use a tomato cage to allow them to grow tall toward the sun.


Water Every Morning

Tomatoes like their water. It is best to water them in the morning so that they have the moisture they will need to bare the drying sun all day. Spray near the roots, not on the leaves. This is said to prevent disease, strengthen the root system, and to keep sunlight from damaging the leaves. 


Harvest when Plump and Rich in Color

Tomatoes can very in color anywhere from orange to dark purple color when they are mature. It is best to become familiar with they type of tomato you have selected to determine what color you should be looking for it to reach. Regardless of the color, every variety of tomato becomes a very rich color when it is ripe and is firm to the touch with just a bit of give.

The very best way to get familiar with when your type of tomatoes are ripe? A good old fashioned taste test will do the trick!

The Best Homegrown Tomato Recipes

Now for the grand finale of growing tomatoes in your garden… eating them! One of the most exciting times of the year is harvesting home grown tomatoes, or seeing them at the farmers market for the first time this season. Now it is time for all the tomato recipes! Here are a few of our favorites.

BLT Sandwich

There are no amount of words that could describe our obsession with a classic BLT sandwich with homegrown tomatoes. Here is the recipe: Toast up 2 slices of your favorite bread (depending on our mood we use anything from white bread to potato bread to 9 grain whole wheat); spread one side of each slice with a generous amount prepared BLT Cheeseball Mix; pile the bread high with slices of your fresh tomato, crispy thick cut bacon, lettuce and if you are like us you won’t be able to resist the addition of thinly sliced red onion. BLTO? Enjoy!

Heirloom Tomato Tart

Prepare to impress your garden party guests with this one! Added bonus: this recipe is just as easy as it is beautiful. Follow along our recipe here that shows you how to use a pre-made crust and your gorgeous homegrown produce to create this side dish that will double as a centerpiece.
Bruschetta

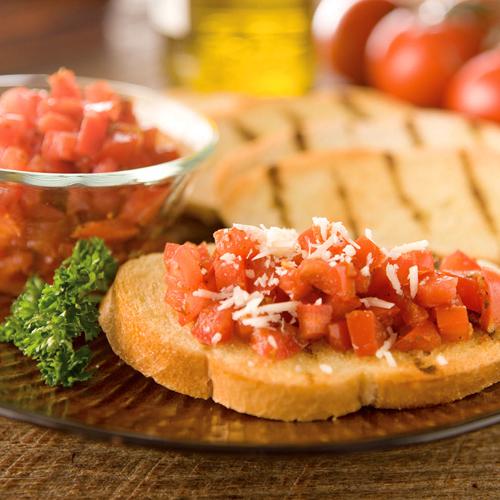
Tomatoes and Italian seasonings combine perfectly in this simple recipe. This is the perfect appetizer for a summertime cocktail party or big summer family get-together. It is easy to double or even triple the recipe, and trust us it will go fast. To make this dish extra special, drizzle balsamic vinegar reduction over the top of the mixture once it is spooned on to toasted bread.
Zucchini Boats

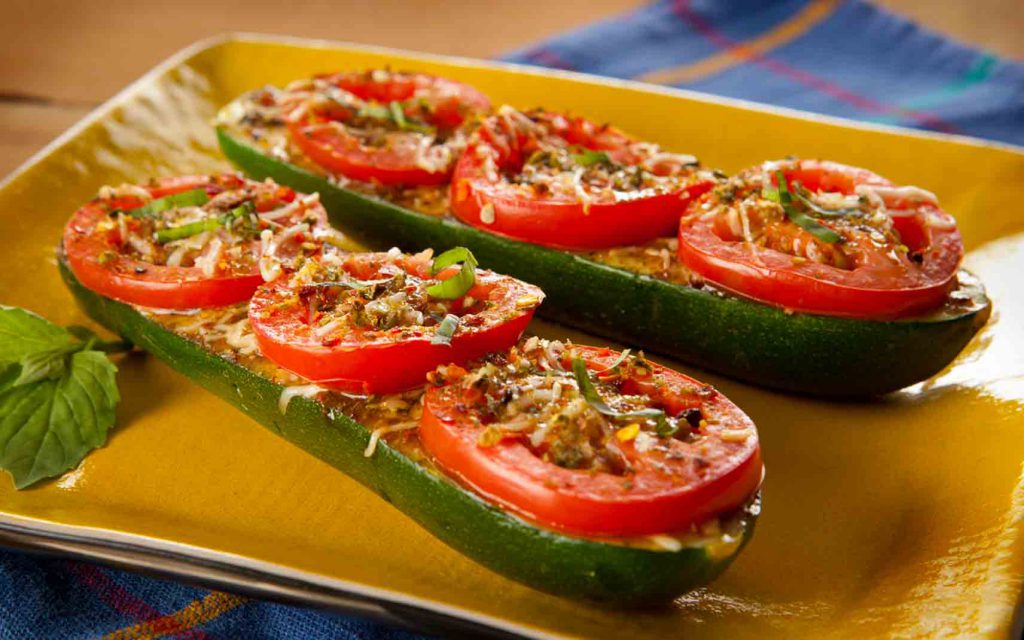
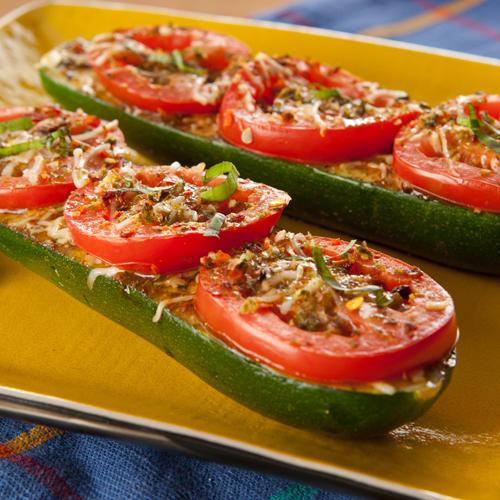
These stuffed zucchinis are filled with meat and topped with tomatoes and cheese, making them an quick side dish or an easy weeknight meal. We just love how they showcase our fresh tomatoes right on top.
Stacked BLT Bites

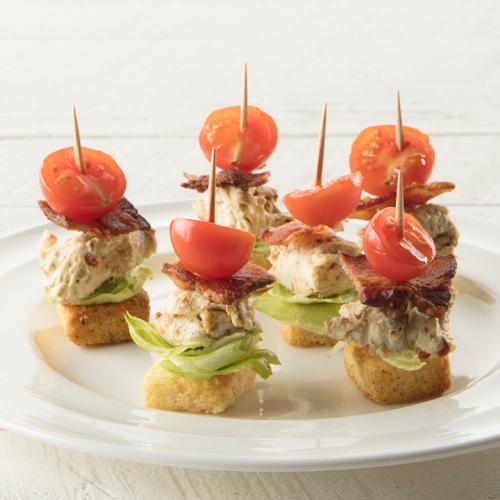
Pretty much that first BLT recipe.. but teeny tiny! These BLT bites use pre-made croutons instead of toast, and we LOVE the ratio of Cheeseball to all the other ingredients. They are flavorful, portable, and adorable. What more could one want?

There is nothing more satisfying than watching something that you have planted and watered every day grow into something beautiful, except then getting to eat it! Growing your own veggies (and fruits) is a great way to spend more time outside, eat more nutritious food, and get the satisfaction of having created something yourself. Let us know how you end up pairing Spring and Summer veggies with Wind & Willow by tagging us on Facebook and Instagram @WindandWillowFoods.


Best Cheesy Bacon Savory Scone Recipe

We love all of the contrasting flavors that brunch is known for. Light breakfast fair like parfaits and oatmeal are accompanied by heavier lunch options like soups and sandwiches. Sweet french toast, pancakes, and pastries are paired with savory options like bacon, sausage, and eggs. So, why not wrap these contrasts all into one perfect brunch recipe? That is just what we did with our Savory Cheesy Bacon Scone recipe below. Follow this step-by-step guide for a dish that is everything we love about brunch in one recipe. 

First things First

Start by preheating your oven to 400 degrees. This seems hot, but it will ensure the crisp outside, moist inside consistency you are looking for. Next, gather your ingredients and measure them out into a medium mixing bowl. First, combine the dry ingredients: Dip Mix, flour, and baking powder. Whisk together until combined. Next, either cube your cold butter into about 1/4 inch pieces, or freeze your butter for about 30 minutes to ensure it is extremely cold and then use the large side of a cheese grater to shred the butter into small pieces. However you accomplish it, you are just wanting the butter to be very cold and cut into small pieces before adding it to the flour mixture.

Cut in the butter in using a pastry knife or fork until the mixture reaches a sandy consistency. Then, slowly add the heavy cream as you stir the mixture (about 2 tablespoons to a 1/4 cup at a time). Mix everything just until everything comes together. You do not want to overwork the dough. 

Shaping, Cutting, and Baking the Dough

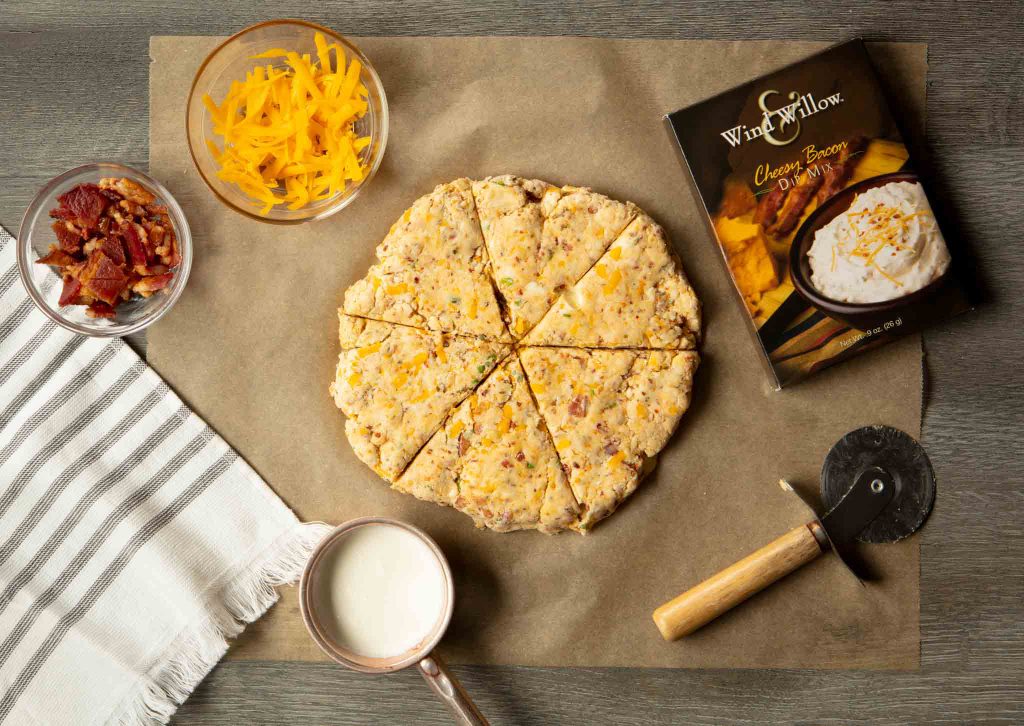
Once combined, turn  the dough out onto a parchment paper lined baking sheet. Using your hands, form a disk that is about 1 inch thick.

Use a knife or pizza cutter to cut the dough into 6 even pieces. Place each piece about an inch or two apart on a parchment lined baking sheet. You can use a basting brush to coat the top of the scones with more cream if you wish, but this is an optional step that we did not find necessary. 

Place the baking sheet into your preheated oven for 20 minutes or until golden brown on the outside. about 2 minutes before they are done cooking you can add extra cheese and crisp bacon to the top of the scones to let them heat and melt before pulling them out of the oven. Let them cool on your pan for at least 10 minutes. The scones will continue cooking on the pan. 

Serve and Enjoy!

We added some chives to the top of our scones when we pulled them out of the oven. Enjoy these savory pastries with a cup of tea or coffee. They make the prefect hearty breakfast for one, or a great addition to a big brunch spread.

Cheesy Bacon Savory Scones

Ingredients:

      • Wind & Willow Cheesey Bacon Dip Mix
      • 1.5 cups all-purpose flour
      • 2 tsp baking powder
      • 4 Tbs cold butter, cubed or grated
      • 1 cup heavy cream
      • Cheese, bacon, and chives for garnish, optional

Directions:

Preheat oven to 400 degrees. Whisk the Dip Mix, flour, and baking powder together in a medium mixing bowl. Cut in the butter using a pastry knife or fork until the mixture reaches a sandy consistency. Slowly add the heavy cream as you stir the mixture. Mix just until everything comes together. Then, turn  the dough out onto a parchment paper lined baking sheet. Form the dough into a 1 inch thick disk and cut into 6 even pieces.  Place each scone 2 inches apart on the baking sheet. Bake for 20 minutes. You can top them with bacon and extra cheese just before pulling them out of the oven, allowing the cheese to melt. After taking them out of the oven, you can top them with chopped chives for a bit of color and freshness.  Allow to cool on the baking sheet at least 10 minutes before serving.

Stay Connected

We love seeing how you and your family gather around our products. Tag us on Instagram @WindAndWillowFoods or on Facebook.com/windandwillowfoods with pictures of your Wind & Willow creations for a chance to be featured on our page! 

Indoor Activity For Kids – Dessert Pizza

Stuck inside all day with the kids? This is the perfect fun and easy indoor activity for kids (or adults).  Dessert Pizza! Bonus: you probably have all the ingredients on hand. Follow our youngest Chef at the Wind & Willow Kitchen as she guides you through the simple, kid friendly steps in this DIY project.  

First things first, you will need a cookie crust. If you have store bought cookie dough (really any flavor should work) this is the perfect application. If not, simply use the baking staples that you have on hand to make a simple sugar cookie dough. Next, follow these steps to turn your dough into “pizza crust.”


Make the Crust

    1. Press cookie dough evenly in the bottom of a greased 12″ round pan.
    2. Bake 16 to 20 minutes or until golden brown.
    3. Set aside and let cool.

Kids will love mushing the cookie dough into the pan or even helping you make the dough if you are going the homemade route. 


Make the Cream Cheese Spread

Next, prepare the “sauce.” Combine a softened 8 oz block of cream cheese with your favorite Sweet Cheeseball Mix. Choosing flavors like Chocolate Chip , Creme Brulee, or White Chocolate Amaretto are a nice base to add a variety of toppings. Try flavors like Lemon Cheesecake, Key Lime Pie, or Chocolate Covered Strawberry for tropical fruit pizzas or Caramel Apple or Pumpkin Pie for a pizza featuring fall flavors like apples, caramel, and candied pecans.

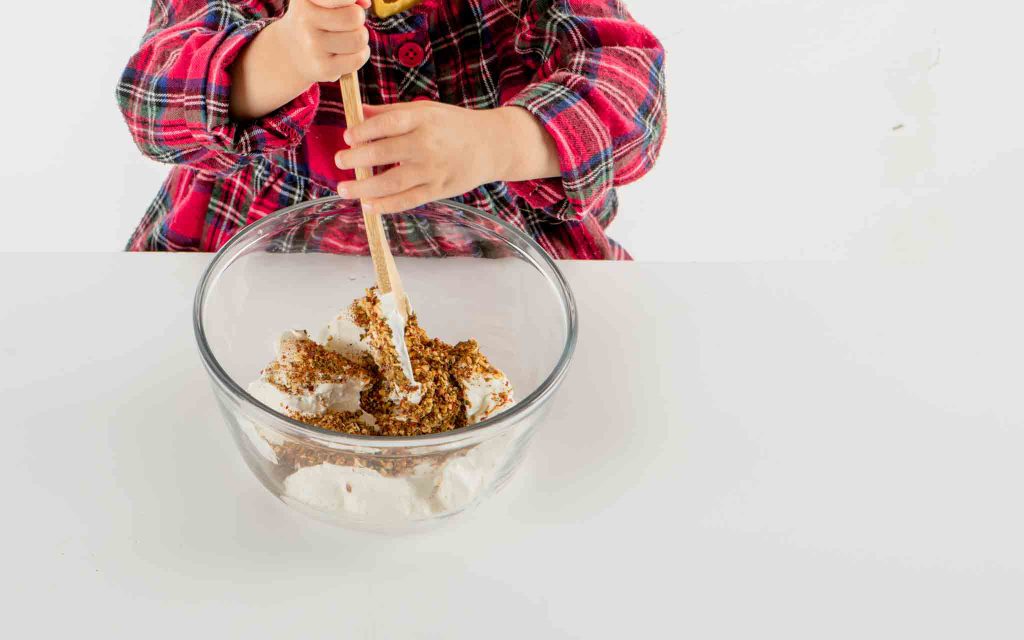
This is a great time for your kiddos to step in and help. They may fling half of the mixture out of the bowl, but you can spare a tablespoon or two. No big deal! After they are done, give the bowl one more little mix to combine and then spread evenly over the top of the cooled cookie crust.


Prepare your Toppings

Our young chef enjoyed decorating from small ramekins that each had a different topping in them. She used chocolate chips, sprinkles, marshmallows, and gummy candies. Anything you have on hand would work: chopped up cookies or candy bars, any flavor baking chip, chocolate syrup and other ice cream toppings, candy, nuts, or fruit are all great choices. Even the topping packet that comes with your cheeseball mix alone will finish off a yummy dessert pizza!


Get Creative

Now it’s time to get creative. No two pizzas are ever the same. It is fun to see what kids come up with on these projects. Have fun and let this cooking project turn into an art project.  Remember, the fact that they have the chance to create something all their own is the most beautiful thing of all.


Final Touches

Add any final touches you feel you need. One last marshmallow? A cherry on top? A dollop of whipped topping? Anything goes here.


Admire your Work and Dig In!

Step back and admire your masterpiece. Kids really take pride when they get to help out in the kitchen. Wouldn’t it be nice to have a friend look at you the way our Wind & Willow Jr. Chef looks at her beautiful dessert pizza!?

It’s no fun to be stuck in the house all day, but if that is where you find yourself, we hope you take advantage of that precious family time for fun projects like this. Tag us on Instagram @WindAndWillowFoods with pictures of you and your family enjoying Wind & Willow for a chance to be featured on our page. 

11 Perfect Spring Recipes

The countdown to spring is on! Like every new season, we love celebrating the onset of warmer weather by gathering around great food with friends and family. For us, spring makes us think of the bright flavors of berries and citrus and the crunch of fresh garden produce. We have gathered 11 perfect spring recipes that will keep you feeling light, but aren’t just a boring salad. These 11 perfect spring recipes include breakfast, appetizers, main dishes, and enough sweets to last you until next winter!


1. Morning Breakfast Scramble

Morning Breakfast Scramble - eggs and toast

Wake up to spring with this easy breakfast! Roasted Red Pepper Dip Mix transforms everyday scrambled eggs into a flavor packed meal. If your family is anything like ours, they will come to expect their eggs to have the subtle heat that wakes these eggs up.


2. Triple Berry Parfait

Berry Parfait with cream cheese

Give your morning parfait a dessert twist by replacing the yogurt with a prepared cheeseball mixture. Here we used Triple Berry Twist Cheeseball Mix, but you could swap in any Sweet Cheeseball Mix you like.


3. Lemon Cheesecake Crepes

Lemon and berry crepes

Ah, Paris in the spring… oh wait! We are in the Midwest and it is still technically winter, but you wouldn’t know it when you are eating these for breakfast. Lemon Cheesecake Cheeseball Mix creates a creamy filling for these simple crepes, that taste anything but simple.


4. Veggie Cups

Ranch dip and veggie cups

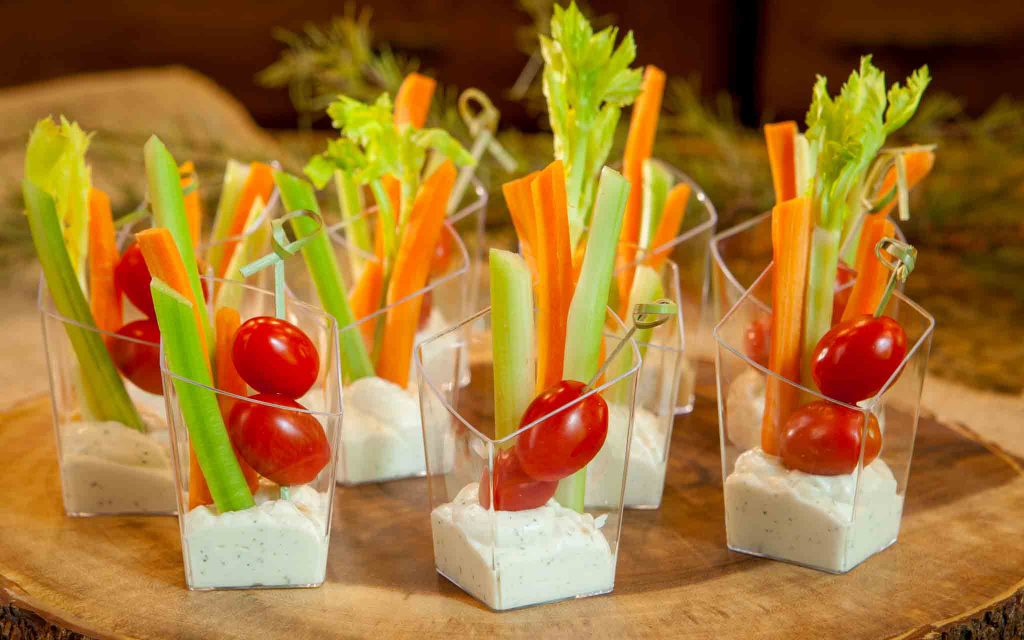
We think this is such a great way to serve our dips! Just pick out any Savory Dip Mix and pair it with the veggies that are looking the best at the grocery store or farmers market. Carrots, celery, and grape tomatoes are always looking fresh and here we paired them with Back at the Ranch.


5. Zucchini Boats

Zucchini Boats with tomato and ground beef

We love this recipe that uses Bruschetta Cheeseball Mix to take simple ingredients to the next level. It makes a perfect app or side dish, and with the addition of ground beef, they become the perfect light main dish for spring. 


6. Lemon Rosemary Chicken

Lemon rosemary baked chicken on cast iron skillet

This chicken is marinated in a SWEET Cheeseball mix! That’s right! Lemon Cheesecake Cheeseball Mix combines with salty chicken broth and a few savory seasonings to create a perfectly balanced sauce that will crisp up chicken thighs without much effort at all.


7. Dessert Pizza

tropical dessert pizza on cookie crust

This “pizza” has our mouth watering. The directions are simple; spread cookie dough evenly across a pizza pan, cover with prepared cheeseball mixture after it has cooled, and top with your favorite fruit. This one is perfect for the kids to help with, and you can use any Sweet Cheeseball Mix you have on hand.


8. Fruit Kabobs in Raspberry Dip

fruit and berry kabob dipped in raspberry cheesecake dip

As simple as this serving suggestion is, it is sure to impress. Whip up a Raspberry Cheesecake Dip Mix according to the directions and serve with berries and mint held together with a toothpick like a kabob. This dessert is somehow decadent and light at the same time, and it is perfect for a springtime brunch.


9. Mini Dessert Tarts

Mini lemon dessert tarts

Simply fill mini pie crusts with a prepared Sweet Cheeseball Mix and top with fresh fruit. This dessert looks super elegant, and yet takes seconds to make. They would make a perfect neighbor or teacher gift – simply place them in a pastry box and tie with a ribbon.


10. Key-lime Cuties

key lime cream filled vanilla sandwhich cookies

The name says it all. These tiny cream filled cookies are adorable. Simply ice the bottom side of a vanilla wafer cookie with Key Lime Pie Cheeseball mixture or your favorite Sweet Cheeseball and top with a second cookie.


11. Lemon Gooey Bars

lemon or berry gooey butter cake with tea

We saved the best for last. This is our take on the gooey butter cake that is said to have originated in our home state of Missouri in the 1930s. The addition of a Sweet Cheeseball Mix makes these even better than the original. Here we used our Lemon Cheesecake Cheeseball Mix, but we also have a recipe for Berry Gooey Bars. To be honest, these are AMAZING with any Sweet Cheeseball Flavor, so go ahead and try them all!


Sunshine on a Plate

Whether the warmer weather has begun to reach your neck-of-the-woods or not, it is always a good time to bring a little sunshine to your food. Your friends and family will love gathering around the bright flavors of spring with you.

Tag us on Instagram @WindAndWillowFoods or on Facebook.com/WindAndWillowFoods with your spring Wind & Willow creations for a chance to be featured on our page. 

The Best Sweet and Savory Combo

Stock up on this Year-Round Favorite

Jalapeño Peach Cheeseball Mix has become a Summer barbecue must, but there’s something about Spring that makes us crave this combo even more. Maybe its the sweet juicy pieces of real peach that has us hooked, or perhaps its the little kick of jalapeño that makes it impossible to stop eating. Here’s what we know for sure: it’s flying off the shelves in stores all around the country (even the staff at Wind & Willow can’t get enough). 

Once you bring a Jalapeño Peach Cheeseball to a party, your friends and family will demand that you bring it time and time again. So, why not change it up by elevating it into a crostini appetizer? You can follow our recipe below that incorporates peach preserves and rosemary to take the flavors to the next level.

Jalapeño Peach Crostini

Ingredients:

Directions:

Combine Cheeseball Mix and topping packet with cream cheese.  Spread 1 tablespoon of mixture onto each slice of toasted bread.  Top with 1 teaspoon peach preserves and sprinkle with rosemary. Serve as a snack or appetizer.

Connect with us on Social Media

We love seeing how you use Wind & Willow to ring in each new season. Tag us @WindAndWillowFoods on Instagram for a chance to be featured on our page. Like and follow us on Facebook to keep up with our latest flavors, recipes, and more!

How to Clean and Season Cast Iron

Cast iron skillets have seen a resurgence in recent years. They remind us of simpler times; however, thinking about their upkeep certainly does not make most people think “simple”. Luckily, learning how to clean and season a cast iron skillet is easier than you think. Read along as we give you our insider tips on keeping them in perfect condition.

Why We Love Cast Iron

It is no secret that we are all about cast iron here at Wind & Willow . We have recipes like Bacon Wrapped Jalapenos and Hot BLT Potatoes that are served up in cast iron skillets, and we have a whole line of Hot Dips with packaging that features smaller versions of the cookware. The following are just a few of the many reasons we love them:

  1. They are nostalgic: Some of us have been around to witness the rise, fall, and rise again of cast iron skillets. In the last 10 years there has been a resurgence of this cookware that holds good memories for many.
  2. They last forever: If you don’t want to buy a new cast iron pan, no worries! Flea markets are filled with these abandoned beauties just waiting to be restored to their former glory. 
  3. They are non-stick: When a layer of oil is heated past the smoking point on the surface of the pan (this is known as seasoning), it creates a smooth, protected non-stick layer.
  4. They hold heat well: Cast iron tends to be thicker than other pans, so it can hold heat longer, making it ideal for serving items that you want to keep warm.
  5. They are beautiful: The dark black color of cast iron creates the perfect backdrop to showcase your culinary creations.

How to Clean Cast Iron

If you have bought a new cast iron from the store, you can skip this step for now. Cast iron only needs to be thoroughly cleaned if rust forms on the surface of the pan. Use steel wool to scrub the pan while it is dry. Once the rust is lifted, scrub it with a scouring pad along with mild dish soap and warm water. Rinse and thoroughly dry the surface of the pan. Immediately season the pan to avoid rusting in the future.

How to Season Cast Iron

Most new cast iron pans come already seasoned, in which case you can also skip on down to the next section. If you bought your skillet used, or your trusty old pan could use some love, this is the best way to easily season your cast iron skillet.

Preheat your oven to 350 degrees. Then, place a small amount of vegetable oil in the pan. Using a clean paper towel spread the oil over the surface of the pan in a sweeping motion. Coat both the cooking surface and the outer surface of the pan in a thin layer of oil (too much oil will cause the surface to become sticky). Next, place the skillet face down on the center rack of the oven and bake for 1 hour. Remove the pan and allow to cool before storing in a dry place.

How to Care for Cast Iron

To prevent rust in your cast iron pan and to help it retain its non-stick qualities, there are just a few steps to take after each use. First, pour course salt onto the cooking surface while it is still warm and rub with a rag. This will get up any bits of food left on the surface. Next, rinse the skillet under warm water and dry thoroughly. Place a couple teaspoons of oil on the cooking surface and coat the inside of the pan using a paper towel. Lastly, place on the stove over medium heat just until it starts to smoke. Cool and store in a dry place.

And That’s It!

It requires a bit of extra work to get your cast iron skillet in working order and to care for it after use, but once you’ve learned how to clean and season a cast iron skillet, it is completely worth the nostalgia that it will bring to the table. Once you purchase a cast iron pan you will never need to purchase one again – unless like us you want to have one in every size possible. Comment below with any other tips you have for how to clean and season a cast iron skillet.

We love to see what delicious Wind & Willow recipes you are serving up at your gatherings. Tag us @WindAndWillowFoods with a picture your favorite way to use cast iron with Wind & Willow for a chance to be featured on our page.

Romantic Dessert for Two

It’s February; love and chocolate are in the air. With Wind & Willow you can show your valentine how much they mean to you through their love language: Food! Create a romantic dinner for two in minutes using our Spinach and Artichoke Cheeseball Mix to make Spinach and Artichoke Chicken Pasta. For dessert, wow them with our Chocolate Covered Strawberry Cheeseball or dress up Brownie Batter Cheesecake Dip Mix with our recipe below by adding more chocolate, brownies, and strawberries.

Decadent Brownie Batter Dessert

  • Wind & Willow Brownie Batter Cheesecake Dip Mix
  • 8 oz package of cream cheese
  • 2 Tbs water
  • Chocolate sauce
  • Milk chocolate chunks
  • Prepared brownie, chopped

Directions:
In a mixing bowl combine the mix, cream cheese, and water, beating with a mixer until light and fluffy. Spoon into a small bowl and top with chocolate sauce, chocolate sauce, and brownie for garnish. 

*Tip: serve with chocolate cookies and fresh strawberries for an extra special Valentine’s Day treat.